Posts

Showing posts from 2013

Dry Erase Calendar/Cork Board

Image
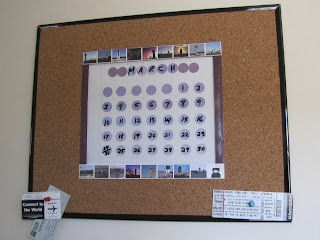
DIY Dry Erase Calendar/Cork Board is a great project and is very useful. You will need a poster board or picture frame. I chose a 20" x 16" poster board. You will need to take the poster board apart or take the glass off the picture frame to place the colored circles for the calendar. Place a white or different color paper first and then glue the circles on top.  (Measure or visually place the circles so that they look centered and lined up. Place the glass back on the poster or picture frame. You will then need to cut out the cork roll. I cut this one (outer section 19" x 15 3/8", inner section 10" x 8 1/4" and the distance from outer to inner bottom 3 1/2", distance outer side to inner side 5",but it all depends on how large you want the calendar area and the cork area to be. Use a large amount of an all purpose glue on cork board, and glue onto frame.  Place some heavy books over cork board for a few hours or overnight. Final

DIY Valentines Dry Erase/Cork Board

Image
Valentines Dry Erase/Cork Board. This is an easy and fun project to make for Valentines day.  I used a 16" x 20" poster board, but you can also use a picture frame. You will need to purchase a cork roll which you can find at any large craft store. First, cut out paper hearts and trace them onto the cork roll, then cut them out. For the letter O, use something circular like a pill bottle, placed upside down to trace the circle. Your will need to draw the inner part of the O and cut it out with a knife, instead of scissors. For the letter X, cut out two thin rectangles and glue them together. The final step, is to paint and glue everything onto the board. Materials Needed: 16" x 20" Poster Board or Picture Frame Dry Erase Markers Scissors Glue Cork Roll Pink Acrylic Paint Red Acrylic Paint

Upcycled Pill Bottles

Image
Upcycled Pill Bottles to store your smaller craft items. You can use colored  craft foam for the top or a piece of cardboard and fabric. If you use the colored foam, just turn the bottle upside down and trace the circular shape. With the cardboard, you do the same, then cut a piece of fabric just a little larger and glue it onto the cardboard, then onto the pill bottle. Cut pieces of ribbon for top and lower part of bottle for decoration. You can also glue a few rows of twine. Very nice looking for any craft room. Materials Needed: Empty Pill Bottles Craft colored Foam/ or piece of cardboard and fabric Ribbons Twine Glue

Seashell Jar

Image
This beautiful Seashell Jar was upcycled from a mayonnaise jar. The wooden sign was made out of flat thin craft sticks. First you make the wooden sign. Cut one side of the three sticks that you are going to place vertical into pointy shapes. Lay them down on a flat surface and evenly spread apart (about 1/2"). Then take four craft sticks and glue them together to make the sign.  You need to glue, then cut the four sticks into one pencil looking point. Then, you glue them on to the three vertical sticks. The last step for the sign is to cut one stick 2 inches, lay it flat and glue the sign onto it. Once you have your sign made, you are ready to glue everything on.  Place some glue on the jar top (enough to cover the whole surface).  Next, you place the seashells, starfish, wooden sign, and you sprinkle some beach sand to the remaining area of jar top. On the sides of the jar top, you place glue, and add some twine in a circular fashion. (even though, I did th